Showing posts with label Purse. Show all posts

Sunday, May 22, 2011

Style Stitches: Everything Wristlet


Oops, I wrote this post weeks ago and then completely forgot to post it. Better late than never.

Annoyingly, my mom commissioned me to make a clutch for her friend but I just knew this month's project in the Style Stitches sew along, the Perfectly Pleated Clutch, was not what she had in mind. She's traditional so I know what she wanted was a clutch made from fancy fabric with a flap closure. Well, I departed from tradition in my fabric choices but decided I should at least appease her by finding an appropriate pattern. Fortunately, further on in the book there's the pattern for the Everything Wristlet, which looked to be exactly what I was looking for.

Because I had so much going on at the time in preparation for a Kentucky Derby party and a trip back home for Mother's Day and my mom's birthday I cheated a bit to make the project go by more quickly. I omitted all of the interior pockets and instead just cut and sewed my lining to match the outer bag. As a result, it went together very quickly so I was able to bang out this bag in just a few hours. I made the small version, which is perfect for a hand held clutch to hold the necessities.


I adore the fabric I chose. I bought the yellow houndstooth fabric a few months ago on a whim a from the clearance section at Jo Ann Fabrics. I was worried about how it would hold up since it has a loose weave but once interfaced it did just fine and looks super cute. The green flap fabric was also from my stash (another Jo Ann Fabrics buy) but I'll admit that I did go out and buy the blue polka dot lining specifically for this bag. I wanted something a little fancier than plain old cotton so found this in the clearance section and went for it. I think it adds a fun dimension and it's got a satiny finish more traditionally found in a clutch. I might try this same fabric combination for future bags since I like it so much.

I'm not 100% happy with the finished bag but that's all down to my lack of skills. As with the checkbook cover, I had a devil of a time top stitching around the curve of the flap, probably because of that darn Peltex, so I wound up ripping those stitches out and left it off. I'm sure the bag would have looked more finished and professional with the top stitching but it just didn't work for me. I also may have installed the snap a little too low since there wasn't really enough room for me to stitch around it. There must be some trick to maneuvering the sewing machine foot around or over obstacles like that or maybe I should have switched to a zipper foot. Anyway, what's done is done. I'm hoping that because she doesn't know the stitching's supposed to be there she won't miss it.

I also skipped the final top stitching around the top of the finished bag because it came out all wonky when I tried. Instead I took advantage of the loose weave of the houndstooth fabric and hand stitched some nearly invisible stitches to close the lining and hold it in place.


The book suggests adding a broach to the flap for some added glamor and I think it makes all the difference here. I managed to find a cool thrift store with a large array of cheap broaches to choose from. This one only cost me $2 and really helps make the finished bag look more, well, finished and polished.

I do like the pattern and think the arrangement of the pieces and the Peltex works great. I hope to revisit this not only to work on those top stitching skills but also so I can try it out with the inner pockets. I look forward to having a cute clutch of my own since I was cruely forced to give this one away.
amybutler-button2


Photobucket

Tuesday, June 29, 2010

Folklore Bag From One Yard Wonders


Yet another discovery I can thank the blogging community for. After seeing enough glowing reviews of and wonderful results from One Yard Wonders I finally got it through to my tiny little brain that it must be a fantastic sewing resource. After a quick cost-benefit analysis I could tell I'd get my money's worth. It helps that they somehow kept the price so low while compiling 101 creative projects in an attractive and well-bound book.

While many of the projects caught my eye, I was most comfortable sewing bags so I skipped straight to that section of the book. The Folklore Bag is now one of my favorite bags to make. It looks more complicated than it actually is to sew and results in the perfect-sized bag for ferrying around the necessities with enough room left for a book (which I consider to be a necessity as well). I've made them as gifts, made them for myself, and plan to make many more.

Birthday present for my mom


A few tips on making the Folklore Bag:
  • Be sure to check the publisher's website for errata before attempting any of the book's projects.

  • Interfacing the straps makes the bag feel sturdier and more professional. For additional stability you might want to try interfacing the lining as well.

  • The interior pocket's a little dinky. Try playing with the dimensions, make it longer for two pockets, or, if you're feeling extra brave, make it into a zippered pocket.

  • I've had success making this bag with any type of fabric. Just remember that interfacing is your friend when using quilting and other lightweight fabric. I even made one (the bat bag pictured above) using a re-purposed t-shirt so I used a stiffer broadcloth as the lining to compensate.

  • Get creative and use a contrasting/coordinating fabric for the lining and/or the upper band. Embellish yours with decorative trim, buttons, or flowers. The pattern's so clean and simple that anything goes!


Wednesday, June 16, 2010

Made by Rae Buttercup Bag

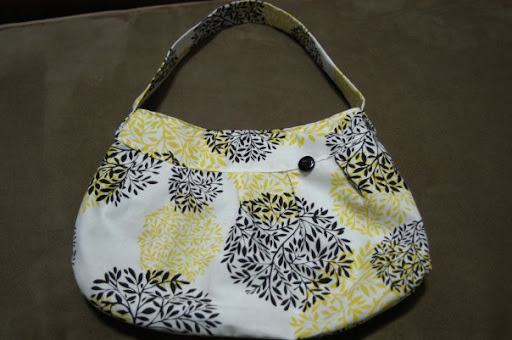
My first proper post should rightly be about the very blog that got me back into sewing and initiated me into the blogging community of sewers in the first place. Some time last year I stumbled across this easy but stylish purse pattern for the Buttercup Bag from Made By Rae. She makes it look so simple! In typical Lina fashion, I did some online research and was so inspired by the beautiful versions everyone had come up with that I figured I too could give it a try. After a trip to Jo-Ann Fabrics and a search for just the right coordinating fabric at J & O Fabrics I whipped up two of them in no time.


Clearly the work of a beginner as I was reviving my long lost sewing skills that reached their acme over ten years ago when I used to sew scrunchies for my friends as a teen, but I was thrilled to discover how easy it was to make something so useful and customized to my tastes. It was a great way to ease me back into the world of sewing. This started me down the dangerous path of searching for more and more purse patterns so I could make bags in exactly the size, style, and color of my choice.

Needless to say, I highly recommend this pattern not only because it's free (music to my frugal little ears) but also because it's hard to mess up yet results in an elegant-looking bag. Albeit one that's a bit small for my needs. I've since experimented with enlarging the pattern on a copier 125% and reinforcing the entire thing with interfacing, which does result in a more professional-looking purse that makes for a perfect gift, just like the ones pictured below. If you're on the fence about trying this pattern I say go for it!


Be sure to check out the extensive Flickr group for inspiration and to see all of the creative variations everyone's come up with. Cheers!