Showing posts with label Sew Along. Show all posts

Saturday, July 23, 2011

Style Stitches Sew Along: Key Keeper Coin Purse


Whoo hoo! I finally sewed something again! I can't explain my reluctance to hunker down with the sewing machine for the past few months but it was nice that this month's sew along project was a simple one to help me ease my way back in. Even better that I had a friend's birthday coming up and needed something to give her as a gift. Perfect timing.

I'm going to jump right in and start bitching about the pattern. I officially hate the way the book has us sew zippers. HATE. I made five of the Origami Bags and could never get it right. I assumed this was simply due to a lack of skill on my part but after reading others' reviews about their frustrations I plan to give up on this method for good. The ends don't look nearly as neat and tidy as they did in the zippered pouches I made from Noodlehead's free pattern. That pattern uses pretty little tabs on each end of the zipper and I much prefer that method and the finished look. Next time I shall give that a try instead. Bree from My Crafty Crap (hosting the sew along) did that with her coin purse and I think it looks perfect. She's planning to post a tutorial about how to do it once she gets a few other items off of her to-do list. Like, you know, giving birth to her first baby. I guess everyone has her own priorities. :P


Rant over, I have to admit that this is a cute little bag that sews together quickly. I hope to make one for myself since I can always use more pouches to organize the junk that keeps accumulating in my purse. I'm glad I'm back in the saddle again when it comes to sewing because I did miss the process and the satisfaction that comes with creating something.

The best part is the bag is the perfect size for storing those extra eyeballs we all have lying around the house. I'm sure that alone convinces you that you need to make one for yourself.


amybutler-button2

Sunday, May 22, 2011

Style Stitches: Everything Wristlet


Oops, I wrote this post weeks ago and then completely forgot to post it. Better late than never.

Annoyingly, my mom commissioned me to make a clutch for her friend but I just knew this month's project in the Style Stitches sew along, the Perfectly Pleated Clutch, was not what she had in mind. She's traditional so I know what she wanted was a clutch made from fancy fabric with a flap closure. Well, I departed from tradition in my fabric choices but decided I should at least appease her by finding an appropriate pattern. Fortunately, further on in the book there's the pattern for the Everything Wristlet, which looked to be exactly what I was looking for.

Because I had so much going on at the time in preparation for a Kentucky Derby party and a trip back home for Mother's Day and my mom's birthday I cheated a bit to make the project go by more quickly. I omitted all of the interior pockets and instead just cut and sewed my lining to match the outer bag. As a result, it went together very quickly so I was able to bang out this bag in just a few hours. I made the small version, which is perfect for a hand held clutch to hold the necessities.


I adore the fabric I chose. I bought the yellow houndstooth fabric a few months ago on a whim a from the clearance section at Jo Ann Fabrics. I was worried about how it would hold up since it has a loose weave but once interfaced it did just fine and looks super cute. The green flap fabric was also from my stash (another Jo Ann Fabrics buy) but I'll admit that I did go out and buy the blue polka dot lining specifically for this bag. I wanted something a little fancier than plain old cotton so found this in the clearance section and went for it. I think it adds a fun dimension and it's got a satiny finish more traditionally found in a clutch. I might try this same fabric combination for future bags since I like it so much.

I'm not 100% happy with the finished bag but that's all down to my lack of skills. As with the checkbook cover, I had a devil of a time top stitching around the curve of the flap, probably because of that darn Peltex, so I wound up ripping those stitches out and left it off. I'm sure the bag would have looked more finished and professional with the top stitching but it just didn't work for me. I also may have installed the snap a little too low since there wasn't really enough room for me to stitch around it. There must be some trick to maneuvering the sewing machine foot around or over obstacles like that or maybe I should have switched to a zipper foot. Anyway, what's done is done. I'm hoping that because she doesn't know the stitching's supposed to be there she won't miss it.

I also skipped the final top stitching around the top of the finished bag because it came out all wonky when I tried. Instead I took advantage of the loose weave of the houndstooth fabric and hand stitched some nearly invisible stitches to close the lining and hold it in place.


The book suggests adding a broach to the flap for some added glamor and I think it makes all the difference here. I managed to find a cool thrift store with a large array of cheap broaches to choose from. This one only cost me $2 and really helps make the finished bag look more, well, finished and polished.

I do like the pattern and think the arrangement of the pieces and the Peltex works great. I hope to revisit this not only to work on those top stitching skills but also so I can try it out with the inner pockets. I look forward to having a cute clutch of my own since I was cruely forced to give this one away.


amybutler-button2


Photobucket

Sunday, April 10, 2011

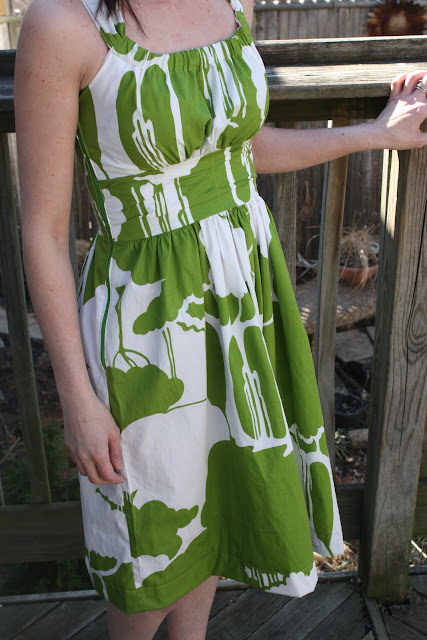
Jamie Dress Sew Along Completed


Things I should have done this weekend: cleaned, read the ridiculously convoluted 700-page book for my book club meeting next week, and done our taxes. But since a friend pointed out that taxes aren't due until the 18th this year I figured I could safely put that last item off until next weekend. Instead, I went ahead and made the dress for Sew Sweetness' Sis Boom Jamie Dress sew along.

The pattern is wonderfully easy to follow with oodles of helpful diagrams and nothing more complicated than sewing a zipper. And even with that their instructions and method make that a piece of cake. The dress is also super cute. The trouble is, it might just be a little too cute for the likes of me. I'm sure I'll wear it but probably more as a special occasion dress, not as an everyday running errands sort of outfit since I'm usually a jeans and t-shirt kinda girl. I'm still not sold on the gathered skirt as being suitable for anyone not young enough to shop in the junior's section and I'm not convinced it's flattering on anyone other than a super skinny girl. Heck, upon channel surfing last night and finding myself unable to tear myself away from the last hour of Pride and Prejudice I noted that the costumes were remarkably similar in design to this dress. Even stick thin Keira Knightley looked like she'd been hitting the Oreos a little too hard in the face of so many gathers.


To solve that problem I might dust off my trusty 9th grade math skills and do some geometry to make a pretty half-circle skirt like Kitschy Coo did with her funky zebra print dress. Unfortunately, from a quick glance at the tutorial, this will involve some time to work the numbers and draft the pattern but I think from seeing her results that's the sort of skirt I'd like.

I'm also not pleased with the bra strap situation. When I saw the pattern I was pleased that the straps on the dress are wide enough to cover a bra strap. Which would be the case if the placement of the straps weren't so awkward. After seeing others struggle with this same problem I went out and bought a convertible bra today figuring that one of the five options would work without having to resort to the dreaded strapless bra option. Alas, if I could get the straps hidden in the front that meant that they peeked out in the back, and vice versa. If there were an easy way to fix that I'd try that next time around.

I also had a small snafu when trying to thread the strap into the bodice when one of my seams connecting the bodice outer to the lining burst at the edge. I probably wasn't being as gentle as I should but next time I'll probably reinforce that seam and skip cutting the seam allowance as it's only a 1/4" seam, which shouldn't add too much bulk. To properly fix it would have meant taking apart the entire bodice so instead I went the lazy route and did some top stitching that I hope isn't too noticeable.

Per Sara's recommendation I did size up and cut the bodice and waistband out in large, which turns out to have been unnecessary for me. Considering that I put on my most padded bra and still was on the low end of the medium measurements I sort of figured I'd wind up taking it in but am glad I erred on the side of caution. Her other recommendation to try it on frequently during the process was a great one. I tried on the dress after I'd pinned the skirt to the bodice and decided to cut 10.5 inches of fabric off from each skirt piece, reducing some of the bulk of the gathers.

I also continued the waistband around the back of the dress, again based on dresses I'd seen others make. I figured because I was using a contrasting fabric for that part it would look more complete with that change. If you're interested in trying out this pattern for yourself I recommend you visit the Flickr group for the sew along and see what everyone else has come up with.


I do plan to make this pattern at least once more since I have a second batch of fabrics waiting in the wings. I'm also intrigued by what Kim at My Go-Go Life did when she found she wasn't pleased with the skirt either. She took out the gathers and lopped off some of the length to turn it into a cute tunic. I can see myself wearing this as a top layered under a cardigan more than I'll wear it as a dress so that's a much more practical version for me.

All in all I'm pleased with the dress, am glad I finally got my feet wet by making my very first dress, and couldn't love the fabric any more than I do. I'm glad I splurged and bought some of the gorgeous Aviary 2 fabric for this project. It helps that I already had the perfect comfy sandals to match!


Try to ignore the scary guy lurking behind me. Our house is so full of Halloween decorations all year round that it's almost impossible to not catch something creepy in the background of every picture.


Photobucket

Monday, April 4, 2011

Fabric Selections For The Jamie Dress Sew Along

I mentioned last week that I'm going to participate in a sew along hosted by Sew Sweetness. I've been getting more and more excited about the prospect of sewing my first dress as I've gone through the painstaking process of selecting the perfect fabrics. After days of indecisively going back and forth I finally settled on what I think will be the perfect fabrics:


I had such a hard time choosing from all of the beautiful Aviary 2 fabrics by Joel Dewberry that I broke down and bought enough to make two dresses. If I'd had an unlimited budget I would have bought some of each design and color combo. It's gorgeous, high-quality fabric that's even prettier in real life than in the pictures.

The first dress will feature Damask in Granite with Lodge Lattice in Vintage Yellow at the waistband. It's hard to tell from the pictures, but the yellows match perfectly and are even more vibrant in person.

The second will feature Sparrows in Plum and a solid-colored waistband, probably in a matching plum. The only way I can justify spending so much on designer fabric for this is if I buy the solid fabric at Jo-Ann Fabrics using a 40% off coupon. Gotta save those pennies somewhere!

To further my excitement, Sara at Sew Sweetness has already made three dresses for herself, each even better than the last. If this isn't enough to inspire me I don't know what will:

Sis Boom Jamie Dress Sew Along!


It's not too late to join in the sew along so if you're interested visit Sew Sweetness for all of the details and to get a great discount on the pattern and your fabric. Wish me luck!

Sunday, March 27, 2011

Sis Boom Jamie Dress Sew Along


Since I'm on a roll with the Style Stitches sew along I figured I'd add more to my plate with a dress sew along. I've been meaning to make myself a dress for over a year so it's about time I got around to sewing one. Considering that it was my tentative sewing goal for 2010 and I bought my first dress pattern over a year ago it seems I need further encouragement to dive in.

Enter Sew Sweetness' sew along, just announced last week. The pattern she's chosen looks cute, simple enough for a beginner like me, and it doesn't use a ton of fabric. Even better is that she's scored a discount on the pattern for all participants and a discount from an Etsy seller who offers tons of beautiful fabrics perfect for this dress.

If you want to join in, head on over and sign up before Friday, April 1st to get the discounted pattern price. Can't wait to see what everyone comes up with!

Saturday, March 26, 2011

Style Stitches Sew Along: Beautiful Balance Checkbook Cover


Confession time: I tend to wing it when it comes to interfacing. If a pattern calls for a specific type of interfacing I usually can't find it in stock at my local Jo-Ann Fabrics so I don't even bother looking any longer. Instead, I keep a supply of several types on hand at home and use the one I think most closely matches what the pattern requires. This tactic usually works out just fine for me, until this pattern, that is.

The pattern itself is pretty easy to follow and is similar to the jewelry roll I previously made from One Yard Wonders. There aren't many diagrams and while I would have appreciated a few more to guide me through certain steps, the written instructions do a good job of explaining it all. Aside from the difficulty of sewing around the curves of the flap it's a very easy beginner pattern.


So here's what I screwed up: I used Peltex for all of the outer pieces including the flap and no interfacing on the interior lining panels or interior flap. I actually think that was a fine move if I'd done a better job of trimming the thick interfacing down so it wouldn't be in the way of the seams. Also, I did interface the inside pocket panels and think that added a ton of bulk to the finished product, making it a little too thick and bulky when folded up. I'm not sure I'd have the room in my purse to carry this around in addition to a wallet. I also wasn't able to properly do the topstitching in the final steps because of the bulk on the flap so mine's a little different looking than the one in the book.

Again, those problems were all due to my own changes and blatantly ignoring the instructions so I'd be curious to see how much better this would turn out if I'd done everything according to plan. As it is, I like it well enough to give as a gift as I intended but I think next time around I'd try to learn from my mistakes and make an even better version.

As usual, I didn't bother to use home decor fabric, instead substituting some quilting cotton on the outside and flannel on the inside. All fabrics were from Jo-Ann Fabrics. Since I'm in a confessional mood I'll also admit that while the exterior bird fabric was from my stash I did buy the interior fabric yesterday specifically for this project. I simply couldn't come up with an appealing enough combo from my existing fabrics and figured since it's a gift I could justify spending the $1.

It's not even April yet and I've already completed that month's project in My Crafty Crap's and JemJam's Style Stitches sew alongs. Yay!

Edited to add: I was feeling guilty about foisting a sub par item off onto a friend so I quickly made a second one using the same fabrics. I did a much better job trimming and lining up the Peltex, used regular interfacing on the flap pieces, left the interfacing off of the interior pocket panels but did interface the interior lining panels. I'm not sure if it's because I used flannel on the inside or if the pattern simply calls for too much interfacing but I certainly didn't need to interface those pocket panels. Any more interfacing would have been overkill.

I'm still not 100% happy with the results as it's very bulky but it does fold up better than my previous version. I also had a ton of trouble with the topstitching in the final steps as the needle could barely plow through at some spots and at the edges the bulk wouldn't even fit under my sewing machine foot. While this pattern makes a pretty little checkbook cover that sews up quickly (even more quickly the second time around, I can report) I'm not sure how often I'll use it in the future.


Saturday, March 12, 2011

Origami Bags, Take Two


I used to be the most organized, on top of everything sort of girl. I'd remember complete grocery lists without needing to jot down a single item, I knew the balance of my bank account down the the last penny without having to look it up, and I never, ever forgot anyone's birthday. Things have changed a lot in the past few years, especially in that regard. I suspect it's because my life has gotten more complicated since then, that I have more people and responsibilities and tasks to keep track of and my tiny little brain just can't handle it all. Now I have a horrible habit of letting people's birthdays sneak up on me and even if I know one's coming up I can't motivate myself to start brainstorming present ideas until the last minute.

I realized on Wednesday that I have a friend whose birthday is coming up next week. Since I'd just gotten done making my first batch of Origami Bags for myself I figured it wouldn't be too difficult to churn out a few more as gifts. Oh, how wrong I was!

In my first review of the pattern I neglected to mention how surprised I was that these took so long to sew. We're talking hours for just one bag. It's not as if the pattern pieces are that intricate to cut out or that there are any fancy sewing skills required. Yet it seemed to take forever. I wrote it off as being due to my unfamiliarity with the pattern but this time around I really noticed the problem since I was trying to cram in all of the sewing in one weeknight. I only got one bag sewed Thursday night and finished the smaller one last night. I doubt this will become my go-to zippered pouch pattern for that reason alone. The end result is cute but it's a bit too labor intensive for something I might like to mass produce as gifts.

I also had a terrible time with the gussets again despite my using the same pin trick. Perhaps that's because it was late at night and I wasn't fully on top of my game. I had to re-do the interfaced corners a few times until I got it right.


Despite all of the difficulties I'm really pleased with the bags. I stuck with the same color combo as before but swapped in a more mature fabric since I know my friend doesn't have the mentality of a ten-year-old. No crazy-eyed bunnies for her. I once again made a large bag since someone accidentally cut out two extra yellow panels last time around and I paired the large with a mini bag. I have to say, I quite like the mini size and might have to make one for myself. It might be even better suited for carrying around my daily necessities than the small bag I'd previously made.

Now it's off to the post office to get these babies in the mail!

Tuesday, March 8, 2011

Style Stitches: Origami Bags


After waiting until the last minute with last month's Amy Butler Style Stitches sew along bag I decided to keep the sewing momentum going and dove into March's project, the Origami Bags, over the weekend. The book actually has directions for six versions available, each in a different size. I didn't intend to make a full set but figured I'd pick three fabrics and make three bags with different arrangements of those fabrics.

I chose to make the x-small, small, and large bags. I feel a bit like Goldilocks as the x-small bag is a little too small for me to find it useful (although my sunglasses do fit in it almost perfectly), the large bag is huge, but the small bag is just the right size. I wanted something I can carry around in my purse to organize my necessities: coupons, receipts, and my extensive collection of Blistex and lip gloss. The small bag fits the bill.


It's a simple pattern for the most part. I've done a few zippers in the past so there was nothing intimidating about that. The only snafu was when I tried to line up the side and bottom seams to sew the gussets. I had to rip out all of the stitching from my first one even though I'd been careful to try to align them by pinching along the seams. That wasn't a foolproof method but I did get better at it by the time I got through the eighth corner. I wound up giving it my best shot and first sewing a basting stitch where I thought the corner should go, then checking the alignment by pulling the corner out through the gap in the lining. Some I nailed on the first try but many had to be redone. I found I had the most trouble with the interfaced corners of the exterior of the bag as that extra bulk made it even harder to gauge the evenness.

Since I had to wait until Monday to hit the fabric store and purchase a zipper for my last bag, I posted a desperate cry for help in the two Style Stitches sew along Flickr groups to see if there's some fancy tip I'm missing out on. Bree from My Crafty Crap, who's hosting one of the sew alongs I'm participating in, had the brilliant suggestion to stick a pin through the seams after pinching the fabric, making sure the pin goes through both seams. Once I had that information I was able to master those darn gussets. It worked like a charm!

Once again, I made an effort to work with fabrics from my stash and while I'm sure I could have come up with something more dramatic if I'd been able to hit the fabric store for perfectly coordinating fabrics, I'm happy enough with the ones I chose. I especially love the bunny fabric, which I bought because it was a great price on clearance and because I thought the bunnies looked dazed and demented. Incidentally, that was also my sole criterion for choosing a husband. Even better is that I was able to supply two of the zippers from the large stash my mom gave me, left over from her own sewing days. Note that I used quilting cotton fabric instead of home decor and the bags sit up just fine on their own. I'm not sure why the pattern specifies home decor weight unless Ms. Butler's just trying to rustle up a little extra cash for fabric manufacturers.

I'm participating in two different sew alongs for this book since they're both running on the same schedule. Check out both My Crafty Crap and JemJam to join in and become eligible to win some fun prizes. Last month, I won a $50 gift certificate to Fat Quarter Shop with my Everyday Shopper so I can attest to the fact that the prizes are legit and, of course, wonderful.


Monday, February 28, 2011

Reversible Everyday Shopper


Yay! I successfully completed my first project from the book I won last month, Amy Butler's Style Stitches. Not only did the wonderful Bree from My Crafty Crap give a copy of the book away but she's also hosting a sew along. I flaked out last month and didn't get around to making the complicated-looking Cosmo Bag so I vowed I'd bust out the sewing machine for this one. I'm glad I waited since the Reversible Everyday Shopper was such an easy bag to sew with nothing more complex than a straight line.

The book is full of patterns for a wide variety of bags. I'm looking forward to trying so many of them out. This is one of the more plain styles in the book and, to tell the truth, it's probably not one I'll probably bother making again as it's written. I don't really have a need in my life for such a huge tote but if you're short on reusable grocery bags it would certainly come in handy for that. Obviously with the bulk it's not the sort of bag you can just roll up and pop in your purse, which is what I prefer to do with mine. I imagine this is intended to be a cutesy bag you carry around at the market and show off while you shop.


This year, I've been making an effort to use up fabrics from my stash so it was difficult to find the perfect combination for this bag. At least I was able to use up some of that Ikea fabric I bought on an impulse and have regretted purchasing since. I swear they must pipe something through the vents in the store to encourage silly impulse buys. There are cute elements that drew me to the fabric in the first place but it's been hard to find a project large enough to show those off. As a result, they've sat unused in my closet for the better part of a year.

Since I was such a slacker and waited until the last minute, I was able to take advantage of everyone else's hard work and read several reviews before I dove into the pattern. I made a few changes to the pattern based on that and some additional ones of my own.

  • I used a third fabric for the pocket because I didn't have enough on hand of the Ikea fabric. The bags I've liked the best from others have used three or more fabrics to shake things up and keep the bag interesting. Some used contrasting fabrics for the side panels as well, which I think works great.

  • I only included one pocket on the side that will probably be inside most often. Partially because I didn't have enough of the fabric I chose to use and partially because I didn't want to obscure any of the cute Ikea fabric.

  • I sewed a seam up the center of the pocket to divide it into two sections. Some of the reviews I read did the same as the pocket was too large and floppy otherwise. Seems like a good choice based on my results.

  • I used quilting cotton for one of sides. I couldn't find coordinating home decor fabrics in my stash and figured one layer of sturdy Ikea fabric would be enough. I think the bag turned out just fine and still has plenty of structure.

  • I only interfaced the quilting cotton side of the bag but did interface both bottom sections. Again, this was based on others' reviews in addition to my own cheapness. The bag still seems nice and sturdy. Honestly, considering how tough it was to sew through some areas once the bag was assembled I can't imagine how my machine would have gotten through that extra bulk.

  • I'm not sure if the instructions state this, but make sure to switch to a thick needle when you're working on the folded section of the straps and sewing around the top of the assembled bag. Even with a size 16 needle I had to hand crank the machine to plow through it all.


All in all it's a neat pattern and I wouldn't mind toying with the size to make a more normal-sized tote. At least now I feel that I deserved the book I won and can't wait to try next month's pattern, the Origami Bag.


Photobucket