Showing posts with label Skulls. Show all posts

Sunday, January 29, 2012

52 Week Photo Project [Week 4]

Alas, poor Yorick!


This week's Paint the Moon theme is "sparkle." I just so happen to own a glitter-covered skull that I thought would fit the theme. Of course, I suspect there are all sorts of tricks to capturing sparkly stuff in low light that I don't know. At least I got a chance to play around with my Bokeh Masters Kit.


52 Week Project Photo Paint the Moon Photoshop Actions PSE

Tuesday, December 13, 2011

Gift Giving Guide for the Weirdos In Your Life

I know the posts around here have been few and far between lately. The truth of the matter is I've been keeping busy in real life and don't always find the time to blog. On top of that, I've been baking less and my crafting has mostly consisted of making presents for others. So I have to keep those under wraps.

Instead of a typical post I will share with you some of the holiday ideas that I've been enjoying this year. I'll begin with a helpful gift guide for any weirdos in your life. This list is, of course, based on the sorts of things I would like.


First up is this $24 cupcake cookie jar from Sourpuss. Sure, it has a skull on top but it's an awfully cute skull, right? See that tiny little bow? Not too threatening.


While you're there, you could also pick up some of these X-ray hand paper napkins for your upcoming holiday soiree. Very festive! At the very least they would get your guests talking. I could so go on a huge shopping spree at Sourpuss. My kind of stuff!

What girl doesn't love a bit of jewelry? Again, in keeping with the weirdo theme you could give the gift of one of these artsy skull pendants from Pamela Love for $70. That may seem like a lot but compared to the $920 talon cuff that first attracted me to her designs it's a bargain.

I have absolutely no idea what I'd do with my own personal library kit but as a librarian's daughter there's something appealing about it. It is a little scary that I grew up using libraries with card catalogs and checkout cards and now those things qualify as novelty vintage items. But oh, the power I could wield with my very own due date stamp!


If I had sassier co-workers I'd buy a batch of Bluntcard mousepads as fun office gifts. Heck, I'm tempted to get the one on the left for myself.


I am dying to get my hands on some of these dessert-themed chocolate bars from Dylan's Candy Bar with flavors like red velvet cake, banana cream pie, and tiramisu. At $8.50 for the set they're not badly priced but it's the shipping expense that kills me. Hopefully you're not as stingy as I when it comes to spending money on your loved ones.


Who in your life doesn't need Star Wars light saber chopsticks? Hmmm? Isn't $12.99 a pittance to pay for something this awesome? Available from Think Geek, another great site for a shopping spree.


It is a little-known fact that Christmas is based on a pagan holiday honoring the undead who have risen from the grave in search of tasty brains. Our tradition of leaving out cookies for Santa actually derives from the ancient practice of leaving tender morsels of brain matter out on December 24th in an attempt to sate the the zombies' hunger for another year. Back then, no one got so ridiculously caught up in the commercialism of the holiday as everyone's sole Christmas wish was that the zombies would stop eating the children of the village. There was no need for any other gift. Following that tradition, I present to you this zombie Christmas ornament from Neatoshop. They have a few other zombie-themed ornaments to choose from for those of us who remember the true spirit of the holiday.


Lastly, what Christmas season would be complete without a visit from some Gremlins? Yes, technically this is a Mogwai, the pre-Gremlin form, but odds are you'll accidentally spill some water on this adorable little ornament while watering your Christmas tree, the Mogwais will get loose late at night and eat the cookies you left out for Santa, and then you know what you'll wind up with. If you're willing to take that chance for an opportunity to display this cutie on your tree head over to Urban Outfitters to buy your very own Gremlin ornament. Pick up one for me too while you're at it!

Saturday, July 23, 2011

Style Stitches Sew Along: Key Keeper Coin Purse


Whoo hoo! I finally sewed something again! I can't explain my reluctance to hunker down with the sewing machine for the past few months but it was nice that this month's sew along project was a simple one to help me ease my way back in. Even better that I had a friend's birthday coming up and needed something to give her as a gift. Perfect timing.

I'm going to jump right in and start bitching about the pattern. I officially hate the way the book has us sew zippers. HATE. I made five of the Origami Bags and could never get it right. I assumed this was simply due to a lack of skill on my part but after reading others' reviews about their frustrations I plan to give up on this method for good. The ends don't look nearly as neat and tidy as they did in the zippered pouches I made from Noodlehead's free pattern. That pattern uses pretty little tabs on each end of the zipper and I much prefer that method and the finished look. Next time I shall give that a try instead. Bree from My Crafty Crap (hosting the sew along) did that with her coin purse and I think it looks perfect. She's planning to post a tutorial about how to do it once she gets a few other items off of her to-do list. Like, you know, giving birth to her first baby. I guess everyone has her own priorities. :P


Rant over, I have to admit that this is a cute little bag that sews together quickly. I hope to make one for myself since I can always use more pouches to organize the junk that keeps accumulating in my purse. I'm glad I'm back in the saddle again when it comes to sewing because I did miss the process and the satisfaction that comes with creating something.

The best part is the bag is the perfect size for storing those extra eyeballs we all have lying around the house. I'm sure that alone convinces you that you need to make one for yourself.


amybutler-button2

Thursday, March 3, 2011

I've Died and Gone to Fabric Heaven


Since I'm making a concerted effort to use up my existing stash of fabric, I have been studiously ignoring the daily emails from Fabric.com that keep cropping up in my inbox. From the subject line alone I can tell they're trying to tempt me with their latest daily deal and coupons, but for the past few months I've sent them straight to the trash. Until I made the mistake of thinking I would just glance at today's email since it promised 15% off Michael Miller fabrics. He's one of my favorite designers and always has a wide offering of cute novelty prints so I thought I'd just make sure there's nothing new out there I absolutely have to have. And that's when I saw his latest: Knitty Gritty.


I do believe my little heart skipped a beat as I beheld the perfect combination of skulls, dead things, and sewing paraphernalia adorning his designs. Seriously? Is there any fabric out there better suited for a weirdo like me who loves skulls and sewing equally? Even better, the evidence of this latest line of fabrics indicates that there must be other crafty freaks like me out there in the world, which brings me even more joy.

Needless to say, my fabric buying fast has officially been broken. Now that I've stocked up on what are probably some of my favorite fabrics of all time I feel safe in sharing this with you. Assuming there are any yards left in the shop now that I'm done with them.

In addition to the 15% off sale going on through 3/7 you can also easily hunt down an additional discount coupon using Google. In fact, to make your life even easier, there's a coupon code good until midnight ET today (3/3) for 15% off. Just type in DOD211. Happy shopping!

Is there anything more awesome than this dead knitter fabric? I posit that there is not.

All photos from Fabric.com

Thursday, October 28, 2010

Pleats Are Overrated, Right?


Earlier this month I signed up for Sew, Mama, Sew's bag swap. I've never done a craft swap before but I was feeling confident enough in my sewing skills to give this one a try. Perhaps I was a bit hasty in making that grand assessment of my skills because I had a devil of a time with the pleated clutch tutorial I tried to follow from A Lemon Squeezy Home.

My partner's description of her preferences was very vague: "I like reusing materials in new and interesting ways. My style is a little punk rock..." Hmm, not much to go on especially since my definition of punk rock style might differ from hers and the rest of the world's. Even after contacting her directly she seemed content with being mysterious and wanted me to come up with something that reflects me. Such pressure! My detail-oriented brain initially recoiled in terror and I worried I'd wind up making something she'll hate until I realized that she's probably easy to please if she's willing to leave it up to me. It was sort of freeing to be able to come up with whatever inspired me based on that tiny bit of information.

If you know me, you'll know that I agonized over the fabric choice for ages. First to choose the main fabric for the outside and then to find just the right fabric to pair with it. I picked up the fun skull fabric at Jo Ann Fabrics and found the purple and gray striped fabric in my stash. For some reason it makes me think of an old-timey circus although I have no idea why. Perhaps it resembles the stripes on a colorful circus tent? The combination of fabrics is strange but appealing, at least to me. Hopefully to my swap partner as well!

Because I personally prefer something small and subtle if I'm going with a bold or strange fabric I opted to make her a clutch, which is something I've never made before but have been meaning to make for myself. What better excuse to push myself and try something new? The pattern I chose would put my zipper- and piping-sewing skills to the test but, again, I was willing to give that a go. Well, turns out I needn't have worried about those as both turned out perfectly. The problem was the pleats, which I think I messed up by not keeping the fabric even enough while folding down. As a result the pleats were loose and wouldn't hold once the bag was all done. After several failed attempts at undoing stitches and re-doing the pleats I was forced to give up and start from scratch. Good thing I like the fabric so much since it looks like I'm stuck with a deformed clutch of my very own. Because the back piece was un-pleated I was able to flip the clutch over and see how lovely it would be even without those pleats, so on my second try I omitted the pleats and made the clutch a little longer. One of these days I might go back and try to get those pesky pleats right but for now I'm very happy with the clutch. The piping's a nice detail and I like that I was able to feature two fabrics on the outside for a little contrast.


My lucky find was a package of metal Halloween studs in the scrapbook section of Michaels. I saw no reason why they wouldn't work on fabric too so I adorned the clutch with a tiny silver skull. Love the little guy!

So we'll see how my first swap turns out. While I'm sure I'll like what she's made me, I'm hoping that she didn't put weeks of work into it while I whipped hers up in a weekend. But then that's how I tend to sew so it's not as if I didn't put hours of effort into it on top of all the time spent planning and shopping for the right fabric. Bottom line is I'm happy with the bag I've made and hope she is too.

Demonstrating that I have no idea how to properly hold a clutch


Monday, October 11, 2010

New Halloween Goodies


I'm slowly putting together a spiffy Halloween "mantle" because everyone else out there seems to have one. I don't want to be left out! Only trouble is I don't actually have a mantle so instead I've carved out some space on a tall dresser I keep in my sewing room. It won't be quite as dramatic as a mantle over a raging fire but it's the best I've got.

I was hoping to wow you all with a picture of the end result but it's taking longer than I expected to cobble together the necessary materials. I'm too impatient to wait so I'll gradually show you what I've come up with. Above you can see my latest purchases from the Dollar Store (the sparkly skull) and Goodwill (the nifty framed silhouette). At first glance the silhouette was nothing special and I was mostly drawn to it for the frame but upon closer investigation I spotted the bizarre eye painted into the girl's neck. Why? I don't know but I think it looks super cool! The best part is it was only $1.

Below you can see the cloche I put together with various Dollar Store materials: a candle base spray painted black, an upside down vase, some Spanish moss, skulls lightly spray painted black, and mutant plastic ants, the only insect that actually scares me. The raven on top is also from the Dollar Store but it may not wind up being permanent, otherwise I would have properly attached it. But I might have other plans for that little guy.


I can't wait to get everything else put together so I can share them too. Stay tuned for those!


Thursday, September 23, 2010

Halloween Candles


Needed something simple and quick to do since I've been struck down with another cold, my second in a month. That's got to be a record for me. I don't have the energy or concentration to attempt anything too in depth so I searched through my bookmarked projects until I found something ideal. Landed upon an easy way to make custom-designed candles and knew I'd found my match.

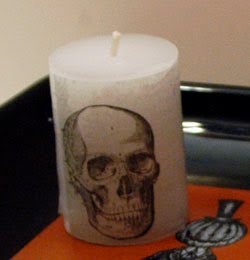
You can add this one to the list of cheap Halloween projects with great results. I picked up some card stock and a package of small white candles (light-colored candles are key with this project) on clearance at Target for $0.74, some white tissue paper from a dollar store, and grabbed some nifty free Halloween images from Graphics Fairy. I followed the handy dandy tutorial at Ador and it really worked! The only trouble I had was feeding the tissue paper-covered card stock through my printer as it kept trying to grab the tissue paper alone. I had to wrap the tissue paper around three sides, tape it down securely, and nudge it through the feeder as it started to print. Other than that it went perfectly. I simply re-sized and printed the images onto the tissue paper, wrapped and trimmed around the candles, and heated with a hair dryer until the wax melted enough to fuse the paper to the candle. It's like magic! Halloween magic!

I can see myself doing this again and again with a variety of images for myself and friends. I'm already coming up with Christmas gift ideas. Fun fun fun!


BWS tips button