
Photo from Made by Rae
See how easy and breezy she makes it look? With just a few measurements and some quick calculations you too can add a lovely top to your wardrobe. Assuming you enjoy looking like you're pregnant with Jabba the Hutt when in reality you've made the effort to lose 80 pounds and want to actually look like it. Oh how I wish I'd had the foresight to take a "before" picture so you could see how horribly misshapen this top made me look. In hindsight I should have been alarmed by the number of sewers proclaiming this to be a wonderful maternity shirt. I still can't quite figure out why mine doesn't look as good as the model's so I shall assume that, as always, it's my darn hips that ruin everything for me. Maybe this is the sort of top that doesn't work well on curvy girls. All I know is that it took me hours of ripped and re-sewn seams and a lot of haphazard sewing to whip this darn thing into shape so it's vaguely wearable by my standards.
Things I like about the top:
- The instructions are easy to follow with step-by-step photos.
- Takes very little time to make if you're actually happy with the results.
- The straps are wide enough to cover everything.
- Much of it is customizable. It's easy to omit things like the icky and girly ruffles and things like the pockets that remind me of something my mom would wear.
Things I do not like about the top:
- The fact that it makes even this child look like she's pregnant and has apparently given her the concomitant back pain.
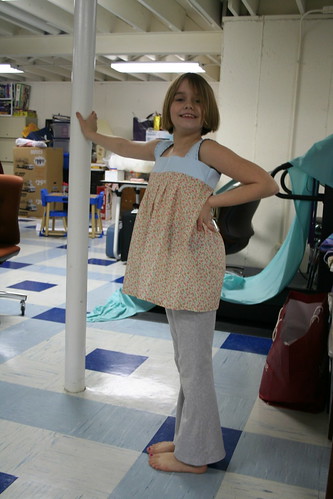
Photo from Mle BB
Unfortunately I cut into some of my favorite Ikea fabric that I was hoarding for the top band, which I deeply regret now. The main fabric was something I bought with a 50% off Jo-Ann coupon so no big loss there even though I do like the design a lot. I got so frustrated that I put this project away for a few weeks until I felt I could face it again. In an effort to salvage the top I tried exaggerating the curve in the shaping step (step 9), which made the top too tight in some areas so those seams had to be ripped out. Several times, in fact, since I kept thinking I could make it work with some adjustment. I tried removing some of the pleats and spaced out the back pleats a little differently, which helped a bit but didn't fully fix the problem. Finally I wound up sewing almost all the way down the front pleats to bring the fabric in a little more and give the top some shape. Sadly this is the best I could do. I'm sure I'll wear this top once in a while but it certainly won't be my first pick from the closet.


6 comments:
I see what you mean about the shirt looking like a maternity shirt! I like that way yours turned out though! I hope you'll consider stopping by my weekly blog party for people to share the things they've made to be worn. I host it every Thursday and I'd love if you linked up!
Andrea @ TheTrainToCrazy.com
Thanks! I love all of the great links you've collected on your blog. There are some great ideas there. I went ahead and added mine too.
Sewing the pleats down really made a huge difference! I might just give this top a go with your modifications. Like you, I like the wide staps.
I actually think yours looks great. The seams on the side do make it better. It's cute!!
I've looked at this top a few times, contemplating sewing it. I appreciate your informative review. Thanks for sharing. Happy Sewing! :o)
Thanks for the tip today!!
Post a Comment