Thursday, December 29, 2011

A Photo A Day [Day 394]

You may say I'm a dreamer

Hope you all had a wonderful holiday season! I played host to my mom and little brother and we took a brief jaunt up to NYC for a few days after Christmas. Got to see Alan Rickman on Broadway where I managed to refrain from drooling. Did lots of shopping, hit my favorite book store (Strand), and ate so much delicious food in just two days.

This was taken on a walk through Central Park on our way to the Museum of Natural History. I didn't even realize it was the famous Dakota Building until later. I just liked the way it peeked through the bare branches of the trees up the winding path.

Monday, December 19, 2011

Mint Oreo Mocha Cupcakes


I'm back, baby! Back with the zany, madcap cupcake recipes. 'Tis the season for overindulgence, right? At least that's the excuse I'm going with for eating these cupcakes. When I saw Baker Royale's Peppermint Mocha Cupcakes I knew they'd be delicious. Of course, somewhere between deciding to make them and actually heading to the kitchen for an afternoon of baking I changed them up a bit to make them even more indulgent.


To start, I reused the idea from my Oreo Truffle Cupcakes to line the bottom of each cupcake with half of an Oreo, this time a mint Oreo for some of that holiday flavor, and nestled a mint Oreo truffle in the center of each cupcake before baking. This resulted in an ooey, gooey, minty center with a fun crunch from the cookie on the bottom. It was like eating a molten mint brownie. Since I lack the patience to make Swiss meringue buttercream and am not too fond of the stuff anyway, I substituted my favorite mint buttercream recipe, the same one that topped my world-famous Thin Mint Cupcakes. Ok, that famous claim might be a bit untrue but that is the most popular recipe on my blog. For good reason. Although I think these new cupcakes might be even better.

I also left the peppermint extract out of the cupcake batter as they were already overloaded with mint from the Oreos and the Andes baking chips. This was probably a good call as the mocha flavor is pretty much overpowered by the mint as it is. The coffee in the batter just seems to enhance the richness of the chocolate flavor rather than standing out as its own flavor. Which is fine with me. The original recipe calls for an extra drizzle of chocolate sauce on top, which looks quite pretty but seems unnecessary to me when there's already so much chocolate in the cake. So I omitted that but if you're up for consuming some extra calories and fat you can snag the recipe for that from Baker Royale.


In the interest of full disclosure, I'll also admit that even though I keep referring to them as "Oreos" I actually used a knockoff version that Aldi sells this time of year. Trader Joe's also has a similar seasonal cookie so anything that vaguely resembles an Oreo with mint flavor should work just fine.

I feel as if I've truly got my baking mojo back with these beauties. They were a hit with my book club tonight and since there are any left I might share one or two with my family. We'll see...


Mint Oreo Truffle Filling
Recipe adapted from Inside BruCrew Life

11 Mint Oreo cookies (or similar), finely crushed
2 ounces cream cheese, softened

Blend crushed Oreos and cream cheese until fully mixed. Shape into 1" balls, place on a baking sheet, and refrigerate while making the batter.


Mint Mocha Cupcakes
Recipe adapted from Bakers Royale

6 Mint Oreos (or similar substitute)
1 cup (4.5 ounces) all purpose flour
1/3 cup plus 2 tablespoons (1.5 ounces) unsweetened cocoa powder
1/2 teaspoon baking soda
1/4 teaspoon salt
1/2 cup (1 stick) unsalted butter, melted and warm
1 cup plus 2 tablespoons (7.3 ounces) sugar
2 large eggs
1/2 teaspoon vanilla extract
1 tablespoon instant coffee (recommended: Starbucks Via)
1/2 cup hot coffee
3/4 cup Andes baking chips

1) Preheat oven to 350 F and line 12 cupcake wells with paper liners.
2) Divide each Oreo into two halves and place each half into the bottom of each paper liner, frosting side up.
3) In a bowl, whisk together flour, cocoa powder, baking soda, and salt.
4) In a mixing bowl, beat together the butter and sugar until well combined. Add the eggs and vanilla and beat at medium speed about 40 seconds.
5) Scrape the sides of the bowl and add 1/3 of the flour mixture. Beat briefly until mixed in. Add 1/4 cup of hot coffee and 1/2 tablespoon of instant coffee. Beat and repeat with 1/3 of the flour mixture followed by the remainder of the coffee and instant coffee. Finish with the last 1/3 of flour mixture. Fold in Andes baking chips
6) Spoon a small amount of batter into the bottom of each well, enough to cover the Oreo cookie. Add one Oreo truffle to the center of each cupcake and top with enough batter to completely cover the truffle.
(You may wind up with a little extra batter as the original recipe didn't use the truffle filling. I made two extra cupcakes in a separate pan without any Oreo filling.)
7) Bake at 350 for 23-26 minutes or until tops spring back when lightly touched. Cool in pan on rack for ten minutes, then remove from pan and cool completely on rack.


Mint Buttercream
12 tablespoons unsalted butter, at room temperature
3 cups powdered sugar
3 tablespoons heavy cream
1/4 teaspoon peppermint oil
Red food coloring (optional)

1) In a large mixing bowl, cream butter for 45-60 seconds.
2) Add powdered sugar and beat at a low speed until the mixture comes together.
3) Scrape down the sides of the bowl and add heavy cream and peppermint oil. Beat until combined and then beat an additional 45 seconds. If necessary, add more powdered sugar for desired consistency.
4) If desired, divide the frosting into two separate bowls and add red food coloring to one. Using a spatula or flat butter knife, "paint" one side of a pastry bag with the red buttercream and the other side with the white buttercream and pipe evenly onto cupcakes.


Tuesday, December 13, 2011

A Photo A Day [Days 390-392]


Another one of those photos where it didn't turn out as I'd planned so I forced it to work with the aid of Photoshop.


Over the weekend I dragged my husband to go see a cabaret/burlesque version of The Nutcracker being performed in Philadelphia. It was a fun enough time that was sort of ruined by the misery we had to suffer upon returning home.

It was shortly after 10:00 PM on a cold winter's evening when we discovered that our front door no longer wanted to open. It was as if the doorknob wouldn't turn far enough to unlock. Called an emergency locksmith who, because our doorknob is old and weird like everything else in our house, was unable to use any of the usual methods to get the door open. In fact, every time we have someone out to repair something the worker always comments on how he's never had to work with a __ (fill in the blank) so strange and difficult to fix. Over the course of the next hour the locksmith wound up hacking the entire doorknob to pieces, bit by bit, using a drill, metal cutters, and a saw. I'm sure our neighbors loved us for the sound of power tools echoing through the peaceful neighborhood at midnight. Let's not even talk about how bloody cold it was locked out of our house as frost formed on the grass and cars. Let's really not talk about how much the entire thing cost us by the end of the ordeal. Still, I was never so grateful to see the inside of my house. The poor cats who were inside when this all went down were petrified beyond belief and didn't recover until the next day.


Hark! Glory to my new-found holiday-flavored milk! What to my wondering eye did appear while wandering the aisles of Target than this red velvet chocolate milk. Yes, it is as odd and tasty as you'd imagine. I simply couldn't resist buying it for my husband.

Gift Giving Guide for the Weirdos In Your Life

I know the posts around here have been few and far between lately. The truth of the matter is I've been keeping busy in real life and don't always find the time to blog. On top of that, I've been baking less and my crafting has mostly consisted of making presents for others. So I have to keep those under wraps.

Instead of a typical post I will share with you some of the holiday ideas that I've been enjoying this year. I'll begin with a helpful gift guide for any weirdos in your life. This list is, of course, based on the sorts of things I would like.


First up is this $24 cupcake cookie jar from Sourpuss. Sure, it has a skull on top but it's an awfully cute skull, right? See that tiny little bow? Not too threatening.


While you're there, you could also pick up some of these X-ray hand paper napkins for your upcoming holiday soiree. Very festive! At the very least they would get your guests talking. I could so go on a huge shopping spree at Sourpuss. My kind of stuff!

What girl doesn't love a bit of jewelry? Again, in keeping with the weirdo theme you could give the gift of one of these artsy skull pendants from Pamela Love for $70. That may seem like a lot but compared to the $920 talon cuff that first attracted me to her designs it's a bargain.

I have absolutely no idea what I'd do with my own personal library kit but as a librarian's daughter there's something appealing about it. It is a little scary that I grew up using libraries with card catalogs and checkout cards and now those things qualify as novelty vintage items. But oh, the power I could wield with my very own due date stamp!


If I had sassier co-workers I'd buy a batch of Bluntcard mousepads as fun office gifts. Heck, I'm tempted to get the one on the left for myself.


I am dying to get my hands on some of these dessert-themed chocolate bars from Dylan's Candy Bar with flavors like red velvet cake, banana cream pie, and tiramisu. At $8.50 for the set they're not badly priced but it's the shipping expense that kills me. Hopefully you're not as stingy as I when it comes to spending money on your loved ones.


Who in your life doesn't need Star Wars light saber chopsticks? Hmmm? Isn't $12.99 a pittance to pay for something this awesome? Available from Think Geek, another great site for a shopping spree.


It is a little-known fact that Christmas is based on a pagan holiday honoring the undead who have risen from the grave in search of tasty brains. Our tradition of leaving out cookies for Santa actually derives from the ancient practice of leaving tender morsels of brain matter out on December 24th in an attempt to sate the the zombies' hunger for another year. Back then, no one got so ridiculously caught up in the commercialism of the holiday as everyone's sole Christmas wish was that the zombies would stop eating the children of the village. There was no need for any other gift. Following that tradition, I present to you this zombie Christmas ornament from Neatoshop. They have a few other zombie-themed ornaments to choose from for those of us who remember the true spirit of the holiday.


Lastly, what Christmas season would be complete without a visit from some Gremlins? Yes, technically this is a Mogwai, the pre-Gremlin form, but odds are you'll accidentally spill some water on this adorable little ornament while watering your Christmas tree, the Mogwais will get loose late at night and eat the cookies you left out for Santa, and then you know what you'll wind up with. If you're willing to take that chance for an opportunity to display this cutie on your tree head over to Urban Outfitters to buy your very own Gremlin ornament. Pick up one for me too while you're at it!

Monday, November 28, 2011

Dark Chocolate Chip Comfort Cookies


Since I scaled down our Thanksgiving meal to the point where it wasn't much more complicated to make than a typical weeknight dinner, I uncharacteristically found myself with a lot of free time Thanksgiving morning. That meant I got to lounge around on the sofa watching the parade and putting together silly Photoshopped pictures for a friend.

Exhibit A of my boredom:


Exhibit B:


And Exhibit C for a different friend:


But once the parade was over, the cranberry sauce for our fabulous turkey burgers was made and chilling in the fridge, and my husband was taking a pre-Thanksgiving meal nap I found myself even more bored than before. What to do, what to do?

I'd been craving chocolate chip cookies for weeks and had just bookmarked an intriguing-looking recipe from Bakerella for chocolate cookies made with peanut butter and dark chocolate chips that are otherwise similar to the chocolate chip cookies I'd been craving. So I decided to whip up a batch. This turned out to be a wonderful decision as they were just as easy to make as chocolate chip cookies but the addition of that peanut butter elevates them to a whole new level. Frankly, I probably would have passed up the Nestle dark chocolate chips in favor of something a little fancier but because Bakerella seemed to be such a big fan of them I picked up a bag when we were doing our Thanksgiving grocery shopping. Boy am I glad I did. These cookies wouldn't be nearly as impressive without that flavor balance.

Since I was incapable of following instructions for any of the recipes I made this weekend, I also changed things up a little with these. I tossed in a few peanut butter chips to go along with the peanut butter in the dough and added some cinnamon since I adore the combination of cinnamon with chocolate. I didn't bother to roll them into perfectly formed balls before baking either, but I'll go ahead and admit that that's because I didn't bother to thoroughly read the directions. Instead I used a cookie scoop and just plopped the blobs of dough onto cookie sheets. The cookies seem none the worse for wear as a result of my mistake as the cookie scoop not only kept the cookies to a uniform size but it also helped shape the dough a bit. I'm also not a huge fan of nuts in cookies so I skipped the optional step of coating each cookie in chopped pecans. If you want to go that route head over to Bakerella's post for all of the details. I refuse to sully my blog with such a thing!

The best part is that my husband's not a big fan of chocolate so I get to keep these all to myself. Which is a good thing because they're so good I think blood might spill if he were to try to take some. Half of the batch went straight into the freezer and I will happily nosh on them in the weeks to come. I suspect that when that supply runs out I'll go ahead and make some more. This recipe just might replace plain old chocolate chip cookies in my baking repertoire when I want to make some easy comfort food.


Dark Chocolate Chip Comfort Cookies
Recipe adapted from Bakerella

1 1/2 cups flour
1/2 cup cocoa
3/4 teaspoon baking soda
1/2 teaspoon salt
1/2 teaspoon cinnamon
1/2 cup butter, slightly softened
1 1/2 cups sugar
1/2 cup peanut butter
2 eggs
1 teaspoon vanilla
10 oz. dark chocolate chips
1/2 cup peanut butter chips


1) Preheat oven to 350 degrees.
2) In a small bowl, mix flour, cocoa, baking soda, salt, and cinnamon using a wire whisk and set aside.
3) In another bowl, cream butter, sugar and peanut butter until light and fluffy.
4) Add eggs and vanilla and mix until combined.
5) Add flour mixture to creamed mixture and mix until combined.
6) Stir in dark chocolate chips and peanut butter chips.
7) Roll cookie dough into 1-1/4 inch balls. (Or not. Be a rebel like me.)
8) Place on parchment paper covered baking sheet and bake 10 minutes.
9) Place cookies on cookie rack to cool.
Makes about 30 2-inch cookies.

Overnight Blueberry French Toast


What holiday weekend would be complete without an indulgent breakfast or two? Or, in my case, four. By the time my husband and I got done working our way through the half dozen donuts from the Amish market (best donuts ever!) and the cinnamon buns we bought on impulse because they were in the day old section it was already Saturday and the loaf of bread I'd bought to make French toast had aged quite a bit. No worries, since the recipe I was planning to use would only be improved by the aging process. I wanted to make a French toast casserole I could prepare the night before and bake first thing in the morning, so the extra dryness of the bread only helped with the overnight soaking process.

I used a recipe for overnight blueberry French toast from Real Mom Kitchen as my jumping off point but made quite a few changes from the original recipe. For one, I omitted the blueberry syrup since I'm a traditionalist and prefer maple syrup instead. I also reduced the amount of cream cheese to four ounces since the entire package seemed to be an excessive amount. I like to save on calories and fat wherever I can and still got plenty of little bites of cream cheese in each serving. In addition, I couldn't bear to empty out the entire carton of eggs as the recipe called for 12 so I checked out some similar recipes online and based on those only used eight. I added a tiny bit more liquid to compensate but honestly couldn't tell anything was missing or wrong with the finished product as a result of that change. To enhance the flavor I added some vanilla extract and a dash of King Arthur Flour's unique citrus and vanilla flavoring, Fiori di Sicilia. Finally, because it was Thanksgiving weekend, I threw in some cranberries along with the blueberries for good measure and topped the entire thing with a dusting of cinnamon.

The dish does have to bake for an hour so it was good to be able to get all of the prep work done the night before. The end result was a perfectly baked dish with slightly crispy bites on top and moist bites from the middle. I had no problems with sogginess, as some French toast casserole recipes sometimes suffer from. The amount of fruit called for is perfect and those small bits of cream cheese are a clever addition. What I'm happiest with were my flavor additions as I really think they made the dish something special. I'll admit that I even had some for dessert later in the day because I couldn't stop craving it.


Overnight Blueberry French Toast
Recipe adapted from Real Mom Kitchen

12 slices bread, cut into cubes (I used a 16 oz. loaf of French bread, Texas toast also works well)
4 ounces cream cheese, cut into cubes
1 cup blueberries (fresh or frozen)
1/2 cup cranberries (fresh or frozen)
8 large eggs
1/3 cup sugar
2 1/4 cups milk (I used 1 1/4 cups skim milk and 1 cup cream)
1 teaspoon vanilla
1/4 teaspoon Fiori di Sicilia (optional)
1 teaspoon cinnamon (or more if desired)


Arrange 1/2 of the bread cubes in a greased 9 x 13 pan.
Sprinkle cream cheese cubes, blueberries, and cranberries evenly over the bread cubes.
Top with remaining bread cubes.
Mix together eggs, milk, sugar, vanilla, and Fiori di Sicilia.
Pour over bread cubes, sprinkle cinnamon on top, and cover pan with foil. Let chill in refrigerator overnight.
Bake covered with foil at 350 degrees for 30 minutes. Remove the foil and bake for another 30 minutes or until fluffy and golden. Serve with maple syrup. Serves 8.


BWS tips button

Sunday, November 27, 2011

Pumpkin Crème Brûlée


Obviously this information comes a little too late for you, but I can report that pumpkin crème brûlée makes for a unique and delicious Thanksgiving dessert. My Thanksgiving meal this year was nontraditional what with a main course of herbed turkey burgers with goat cheese and cranberry sauce so why should the dessert follow the traditional rules? Not to mention that I hate making pie crust so this seemed like a much better dessert option for the day. Why muck about with a fussy pie crust when I can play with a blowtorch instead?


I halved Emeril Lagasse's recipe from Food Network since it has such rave reviews. Sure enough, it was creamy and perfectly flavored and practically foolproof. I did wind up with slightly dark tops that tasted a little burnt, but that was easily scraped off with a spoon before adding the crisp sugar topping. I also used more than the paltry amount of sugar called for on top so there could be a nice, thick crisp layer to break through. Yum yum! No need to wait until next Thanksgiving to make this for yourself.

Wednesday, November 23, 2011

The Cupcake Recipe That Lied to Me


Oh yes, this is quite the tale of deceit. It is the story of an innocent little baker, eager to please her book club group with some tantalizing seasonal cupcakes. She scoured the internet searching for the perfect recipe and slaved away in the kitchen, only to be crushed by sadness at the discovery that her cupcakes tasted nothing like the ingredients she'd put into them. It is a dramatic tale of loss and betrayal, worthy of being ranked with Shakespeare's best. Or not. Perhaps it's just another all too common story of trying out an recipe from a random blog and coming up with something less than stellar. Reminds me that it's sometimes best to stick with recipes from published cookbooks.

The recipe in question was meant to be Eggnog Cranberry Cupcakes with White Chocolate Spiced Buttercream from Your Cup of Cake. From my book club's taste test the only flavors that could be detected in the finished product were the cranberry and the spice. Disappointing because my husband loves white chocolate and we both love eggnog, so I was hoping for a great combination of seasonal flavors here. Unfortunately, the eggnog flavor disappeared completely and there wasn't enough white chocolate in the frosting to actually give it that flavor. Still, the amount of spice is spot on and the frosting is nice and fluffy. If I hadn't told anyone what the cupcake was supposed to be they would have happily assumed I'd served them spiced cranberry cupcakes.

On top of that I took the trouble to leave a comment on the blog post basically saying that while the cupcakes were good they were not as advertised/what I expected so I was left disappointed. I didn't intend for it to be a mean comment or anything, just trying to help other readers out in case they're tempted to try this recipe. When I visited the page again later in the day to work on this blog post I noticed that the blogger had deleted my comment. That makes me a little mad. That's pretty poor blogging behavior right there, to censor things so only comments from adoring fans are shown and "real" comments from people who have tested the recipe get deleted. Despite the number of other delicious-looking cupcake recipes on her blog I don't think I can trust that her blog posts or the comments are honest and helpful so I'll pass on making anything else from her blog.

Thursday, November 17, 2011

DIY Harry Potter Wands


To cement my status as the nerdiest nerd who ever lived not only did I, a fully-fledged adult, visit The Wizarding World of Harry Potter but I also made magic wands for my friend and me to carry around the theme park. I found a few online tutorials and used them as a jumping off point but pretty much made it up as I went along.


Casting a spell on the Hogwarts Express

I started with a humble chopstick, which I rolled into the center of a tube of construction paper, rolled to be slightly narrower at one end. The tutorials I found said to fill the tube with oodles of hot glue, which is a fine idea in theory but turned out to be difficult to do in reality. I did my best but even after redoing one of the wands there were still a few empty pockets where the hot glue didn't reach before it hardened. Still, I figure that between the chopstick and all of the paint the wands will hold up just fine for casual use. I'll avoid casting Unforgivable Curses with these wands just to be on the safe side.


I snagged the idea to add glass stones at the end from a tutorial at Kate's Escapades with the added idea to personalize each wand with different images Mod Podged to the underside of each glass stone. I'd done something similar in the past making magnets from this tutorial at Sew Woodsy. I just clipped the images from catalogs, hers a sequined green fabric from Boden and mine a cross from an image of the Queen's crown in some British catalog I receive.


From there it was just a matter of adding paint and some decorative details with more hot glue. There's no right or wrong way to do this so I got creative and did the best I could with my unwieldy glue gun. Because my friend and I have such different personalities I thought I'd make her wand a nice brown "wood" with green and silver accents. My wand, on the other hand, would have to be dark and evil as befits a wizard like myself. I painted hers brown, piped on some hot glue in swirly patterns (lots of great ideas for different patterns here), and painted over those details with silver and green metallic paint. To give it a more textured look I used a sponge brush and lightly painted over the entire thing with a mixture of dark gray paint and water. Mine was done the same way with dark gray paint and silver accents.

I'm happy to report that the wands worked perfectly. Here I am getting ready to use mine in a crowded store to compel this woman to move out of my way:


Alright, alright. I felt a little goofy walking around brandishing my magic wand but we wound up getting a few compliments on our homemade wands. We even got one from someone who works there and proclaimed that they looked nicer than the ones they sell in the gift shop for $30. The cutest part was when my friend was sternly warned by the conductor of the Hogwarts Express to be careful when waving her wand about as wand safety is so very important. Too true. I guess we have a lot to learn before we're fully qualified to use these things.

I know it looks like I'm casting a spell on my friend's armpit. That's because I am. If it works, she'll never grow hair there again! Guess I should have been considerate and cast the spell on her other armpit as well. Oops.

Monday, November 14, 2011

A Photo A Day [Days 385-389]


Golly gee, I have a lot of catching up to do around here. I have been absent for far too long. October turned out to be quite a busy month for me what with turning 30 for the first time, visiting Napa, CA and dining at one of the finest restaurants out there, the French Laundry, and taking a second vacation to a place I've been dying to visit ever since it opened: The Wizarding World of Harry Potter theme park. What better way to both celebrate and ignore the fact that I'm getting old? So many adventures meant blogging took a back seat to my going out and actually living my life.

Luckily for you I have many photos to share. The photo above is from the amazing replica of Hogsmeade village they've created for the theme park. Being there was truly like walking into the pages of the books. Below you can see one of my favorite parts of the park, the inside of Hog's Head pub. There they served all of the treats from the books including butterbeer, pumpkin juice, and imported British beers. Not to mention the place was tastefully decorated, as you can see.


The highlight of the trip was getting to experience all of this with my best friend. Jessica and I have known each other for almost 20 years, and when I realized the number was that big I was a little shocked. She's such a great person with fun spirit so I couldn't imagine a better companion for the trip. As you can see, she has no shame when it comes to enjoying herself.


I also decided to shake things up a bit and try a new hairdo. I'm not 100% happy with it but my attitude about my hair is that it'll always grow back. No harm in trying something different now and then. Here you see my true nature shining through:


This last picture has nothing to do with my trips but I felt like getting back in the Photoshop groove and put this together.

Monday, October 24, 2011

The Zombie Invasion Has Begun!

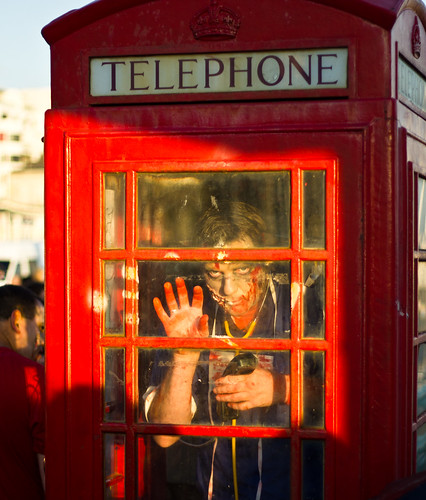
A photography friend of mine, known on Flickr as Eyebrows 360 even though I know his true secret identity to be something much more normal, witnessed the dreaded zombie invasion and managed to survive long enough to post pictures online. It has begun. All of those hours I spent carefully studying zombie movies and reading survival guides will come in handy in the days to come. Sure, this invasion took place in Brighton, England, but it's only a matter of time before the infection spreads to our shores. Expect to see scenes as horrifying as these soon:


How cool is that?! All photos are from Eyebrows 360. Be sure to check out his Flickr set for more gory shots from the day.

In I-shouldn't-be-as-sad-about-this-as-I-am news, it looks like running in this year's zombie 5k in my hometown of Charlottesville, VA isn't in the cards for me. Initially, I thought it would be a convenient jaunt as we're going to be in northern Virginia that weekend for a family event, but between the University of Virginia having family weekend, thus filling the area hotels, and some UFC pay-per-view event the night before that my husband simply can't miss (thus ruling out a stay at my mom's cable-free house) it looks to be more trouble than it's worth. Besides, why add an extra four-hour drive to our trip just so I can do a 35-minute run? At least that's what I'm trying to tell myself when I get all teary eyed at the thought of missing it. All those weeks of training for nothing. At least I know that it's something I could do if geography weren't an issue. That's nowhere near as good as the sense of accomplishment I'd feel if I actually did the race but it's the best I'll get.

Wednesday, October 19, 2011

A Photo A Day [Days 381-383]


I've been furiously working to sort and process my numerous vacation photos and have managed to come up with a few of my favorites. We were lucky to have a chance to visit one of my cousins and her two cute kids. Tristan is the youngest but even at his age he's already developed some impressive boxing skills. Here he is delivering an uppercut to my brother's jaw. I didn't even have to bribe the kid or anything; he did this all on his own!


We spent a few days in beautiful Napa, a place I can't wait to visit again. Because my older brother's into nature we tracked down a walking trail and explored a bit. He even found some grapes growing wild in the woods and managed to pick a nice haul.


Things got a bit out of control when it came to processing this photo from Yountville, CA in the Napa area.

My Preciousssss: The Story of a Girl and Her Jo Totes Bag


Guess who is the proud and extremely happy owner of her very own Jo Totes camera bag? Thanks to my amazing and thoughtful aunt, uncle, and cousins I am! I took a belated birthday trip to California last week to visit my family in Monterey and play around in Napa. While I was there, they not only surprised me with a delicious meal at a fancy restaurant and a yummy marzipan-covered cake, but they also gave one of the best birthday presents I've ever gotten. I can't tell you how shocked I was when I opened my wonderful gift. To understand how thrilling this acquisition is to me, allow me to share the saga of my quest for a Jo Totes bag:

A long time ago in a galaxy pretty much exactly where I am now, I started seeing giveaways for a pretty camera bag making the rounds in the blog world. The bag is not only sturdy with padded inserts that can be rearranged to suit one's camera configuration, but it's also absolutely adorable. It comes in all sorts of trendy colors and styles with cute contrasting interior fabrics. A much nicer alternative to the plain, androgynous camera bags that dominate the market. Just the thing a budding photographer like myself needs in her life. For over a year I've been dutifully entering every giveaway I can track down but the bag always goes to some other lucky soul. Why couldn't it be me?!

I will admit that there came a time when I began to despair that the big prize would forever elude me. Coincidentally, this was around Christmas last year so I started dropping subtle hints for my husband that what I hoped to receive from Santa was this bag. Christmas came and went with no bag. Then I saw that some fortunate ladies were bequeathed the bag by their mates for Valentine's Day. Again with the hints. February came and went. Still no bag. Down but not out, I rallied again for our anniversary in June but my pleas fell on deaf ears. As a final resort, I went ahead and put together a birthday wish list for my milestone 30th birthday and sent it to my husband. I even prioritized the various items on the list with the bag at the #1 spot. I also made sure to mention it a few times on Facebook in case that still wasn't obvious enough for him. Alas, I knew all of my plotting had failed when I heard him in the other room surveying my wish list and he said, "Ninety dollars for a camera bag?! That's not going to happen!" Hey, at least I had that warning so I didn't wake up on my birthday expecting one.


The good thing is that someone did notice my shameless begging on Facebook: my lovely relatives. They sneakily went ahead and picked out the perfect bag for me without my having a clue! The best part is that I was torn between two colors, teal and sugarplum, so they kindly made that tough decision for me. As you can see, I couldn't wait to start using my new bag and carted it around Napa with me. It's such a beautiful area that I simply couldn't leave the hotel without my camera and what better way to carry it than in this stylish bag? I hope my family reads this so they can know how very happy they made me. Love them!

My slightly undignified look of glee